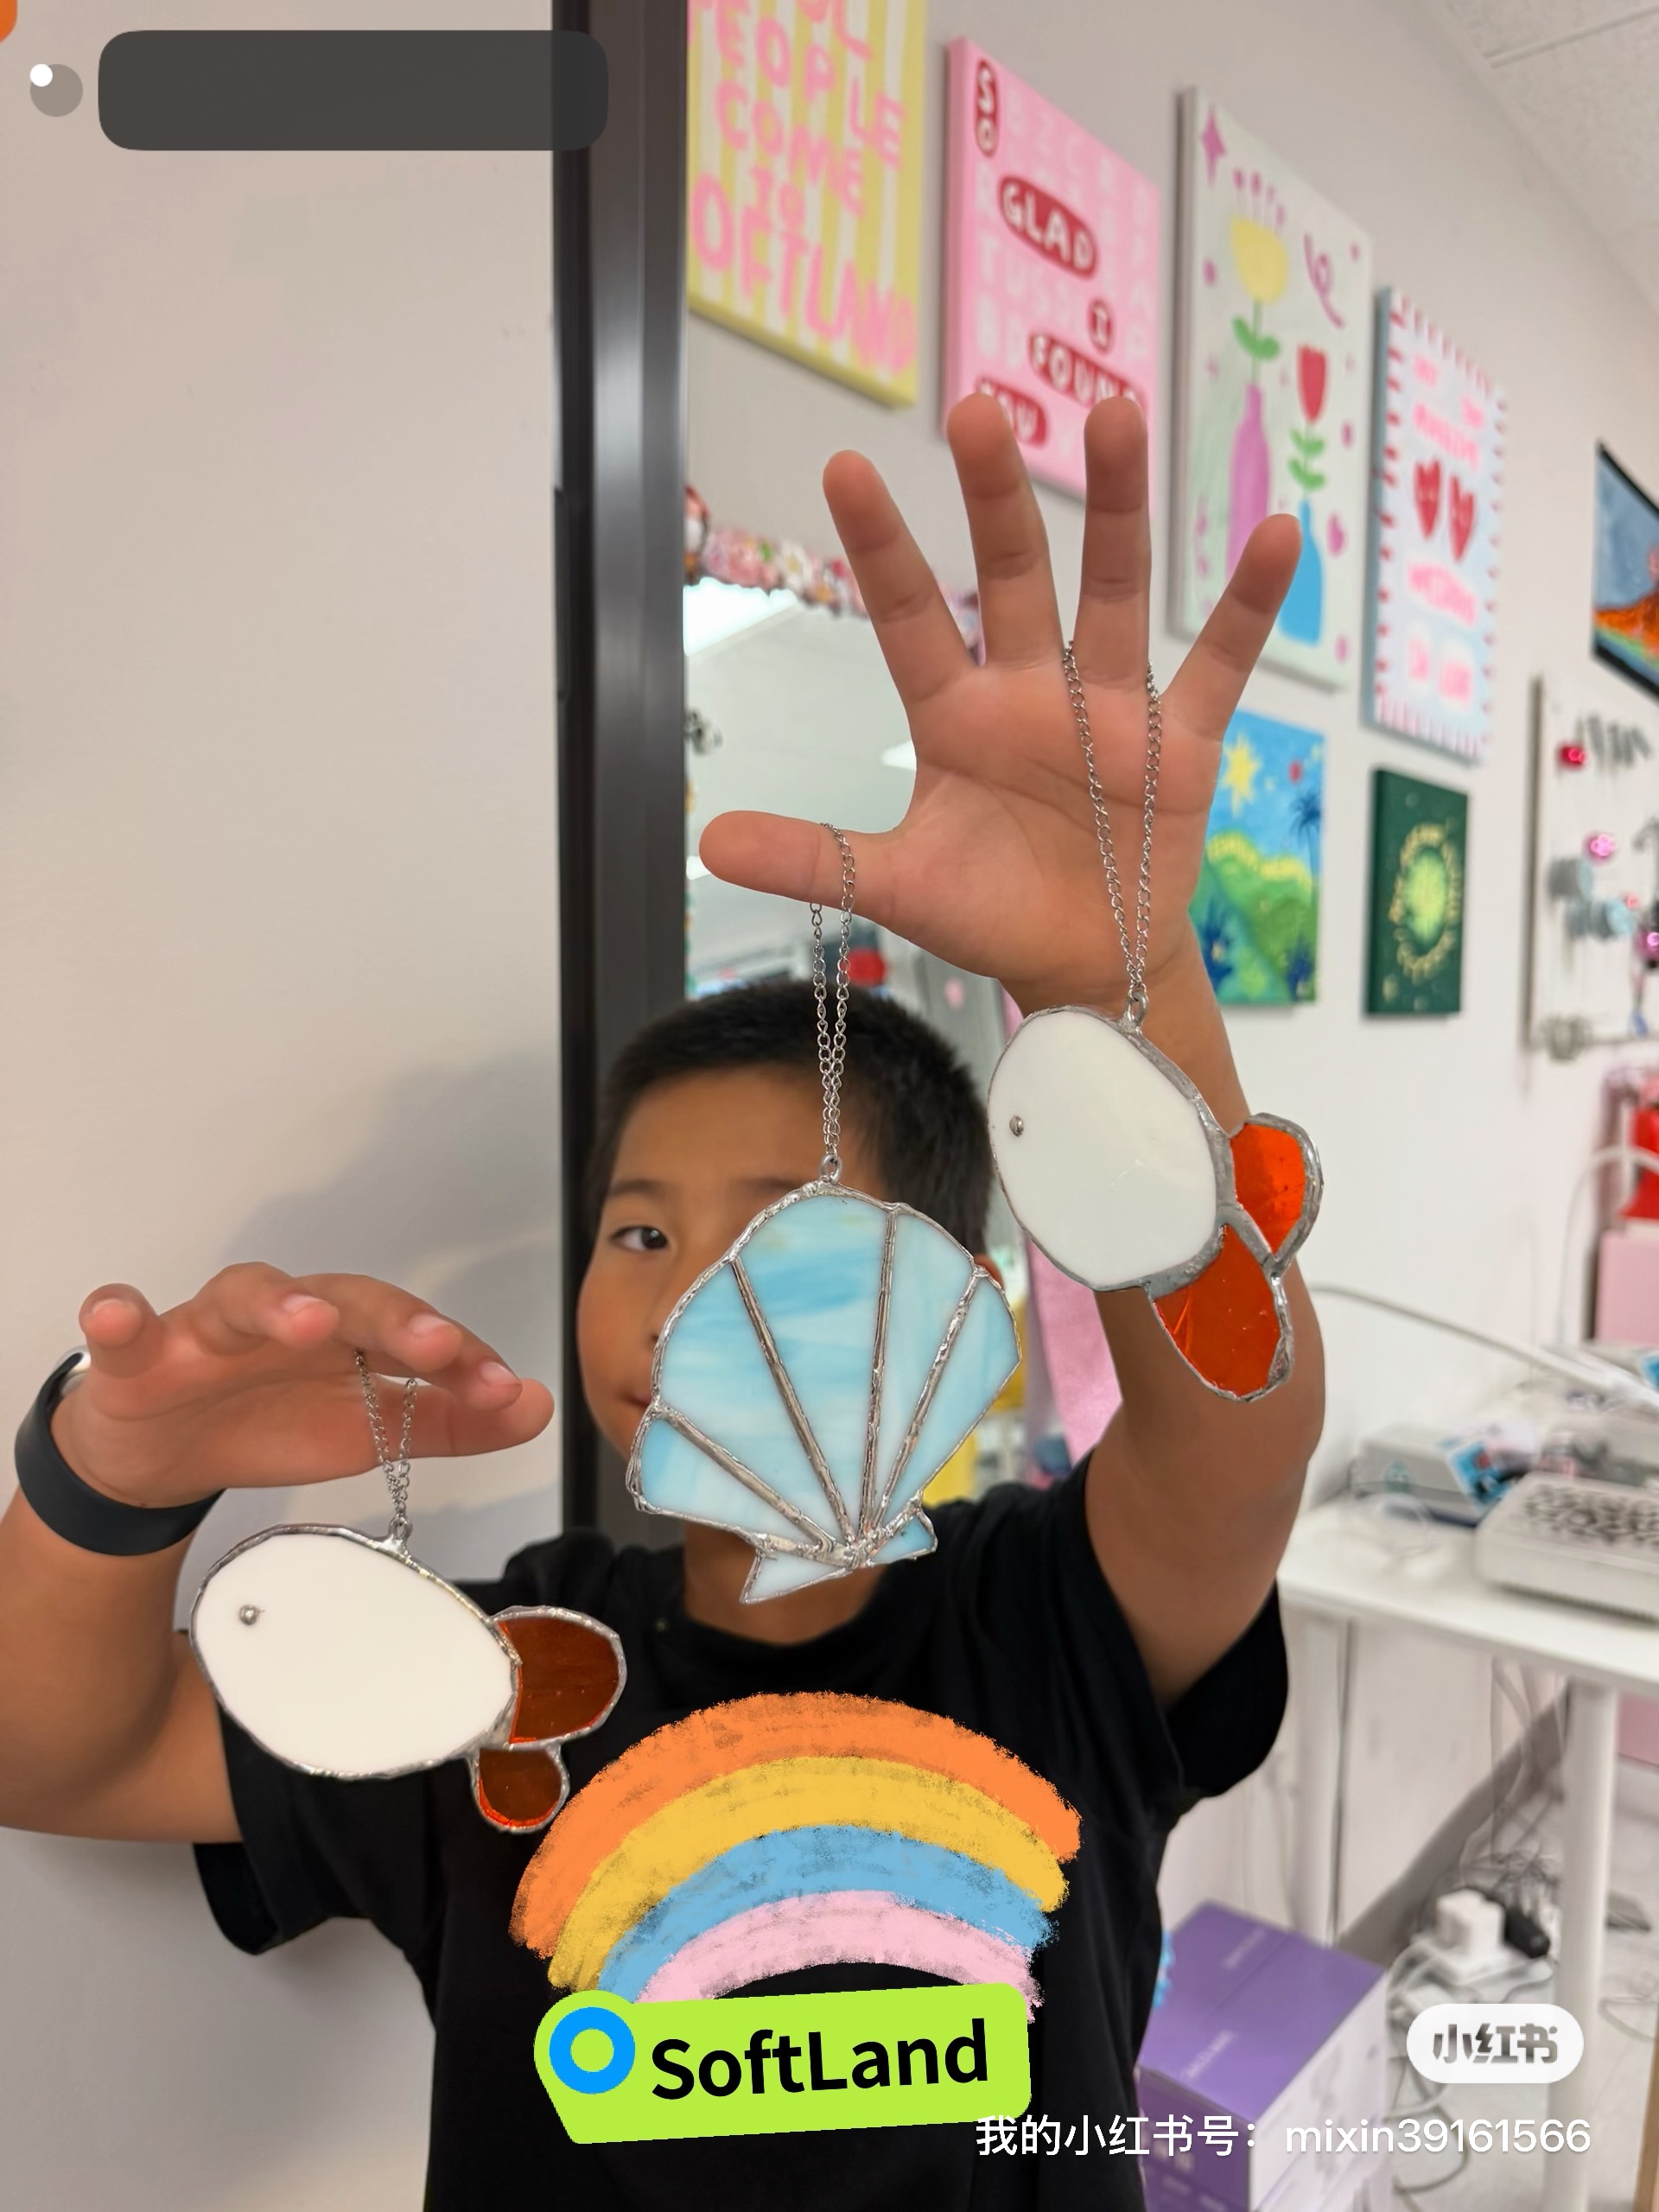
Today I went to a stained glass class. I made two fish and one clam — three projects! They were kind of tiny, but it was really, really fun.
Before I tell you about how I made them, I want to share the two most important things I learned today. If you ever try stained glass, please remember these.
⚠️ Important Thing #1: The Soldering Iron Is REALLY Hot
When you are using the soldering iron — it’s like a metal pen that melts metal — you need to be very, very careful. It is very, very hot.
My mom accidentally touched one of the little dribbles of melted metal before it cooled down, and she got burned. I think the iron was around 400 degrees or something. So even after the metal drips onto the table and looks like it’s done, it is still super hot. Don’t touch it. Wait a long time before you touch anything.
This is the most important rule. Seriously.
🔬 Important Thing #2: The Metal Doesn’t Actually Stick to Glass
This is the part that really surprised me.
The melted metal (it’s called solder) does NOT stick to glass. It only sticks to copper. So before you can solder anything, you have to wrap copper tape around the edges of every single piece of glass first.
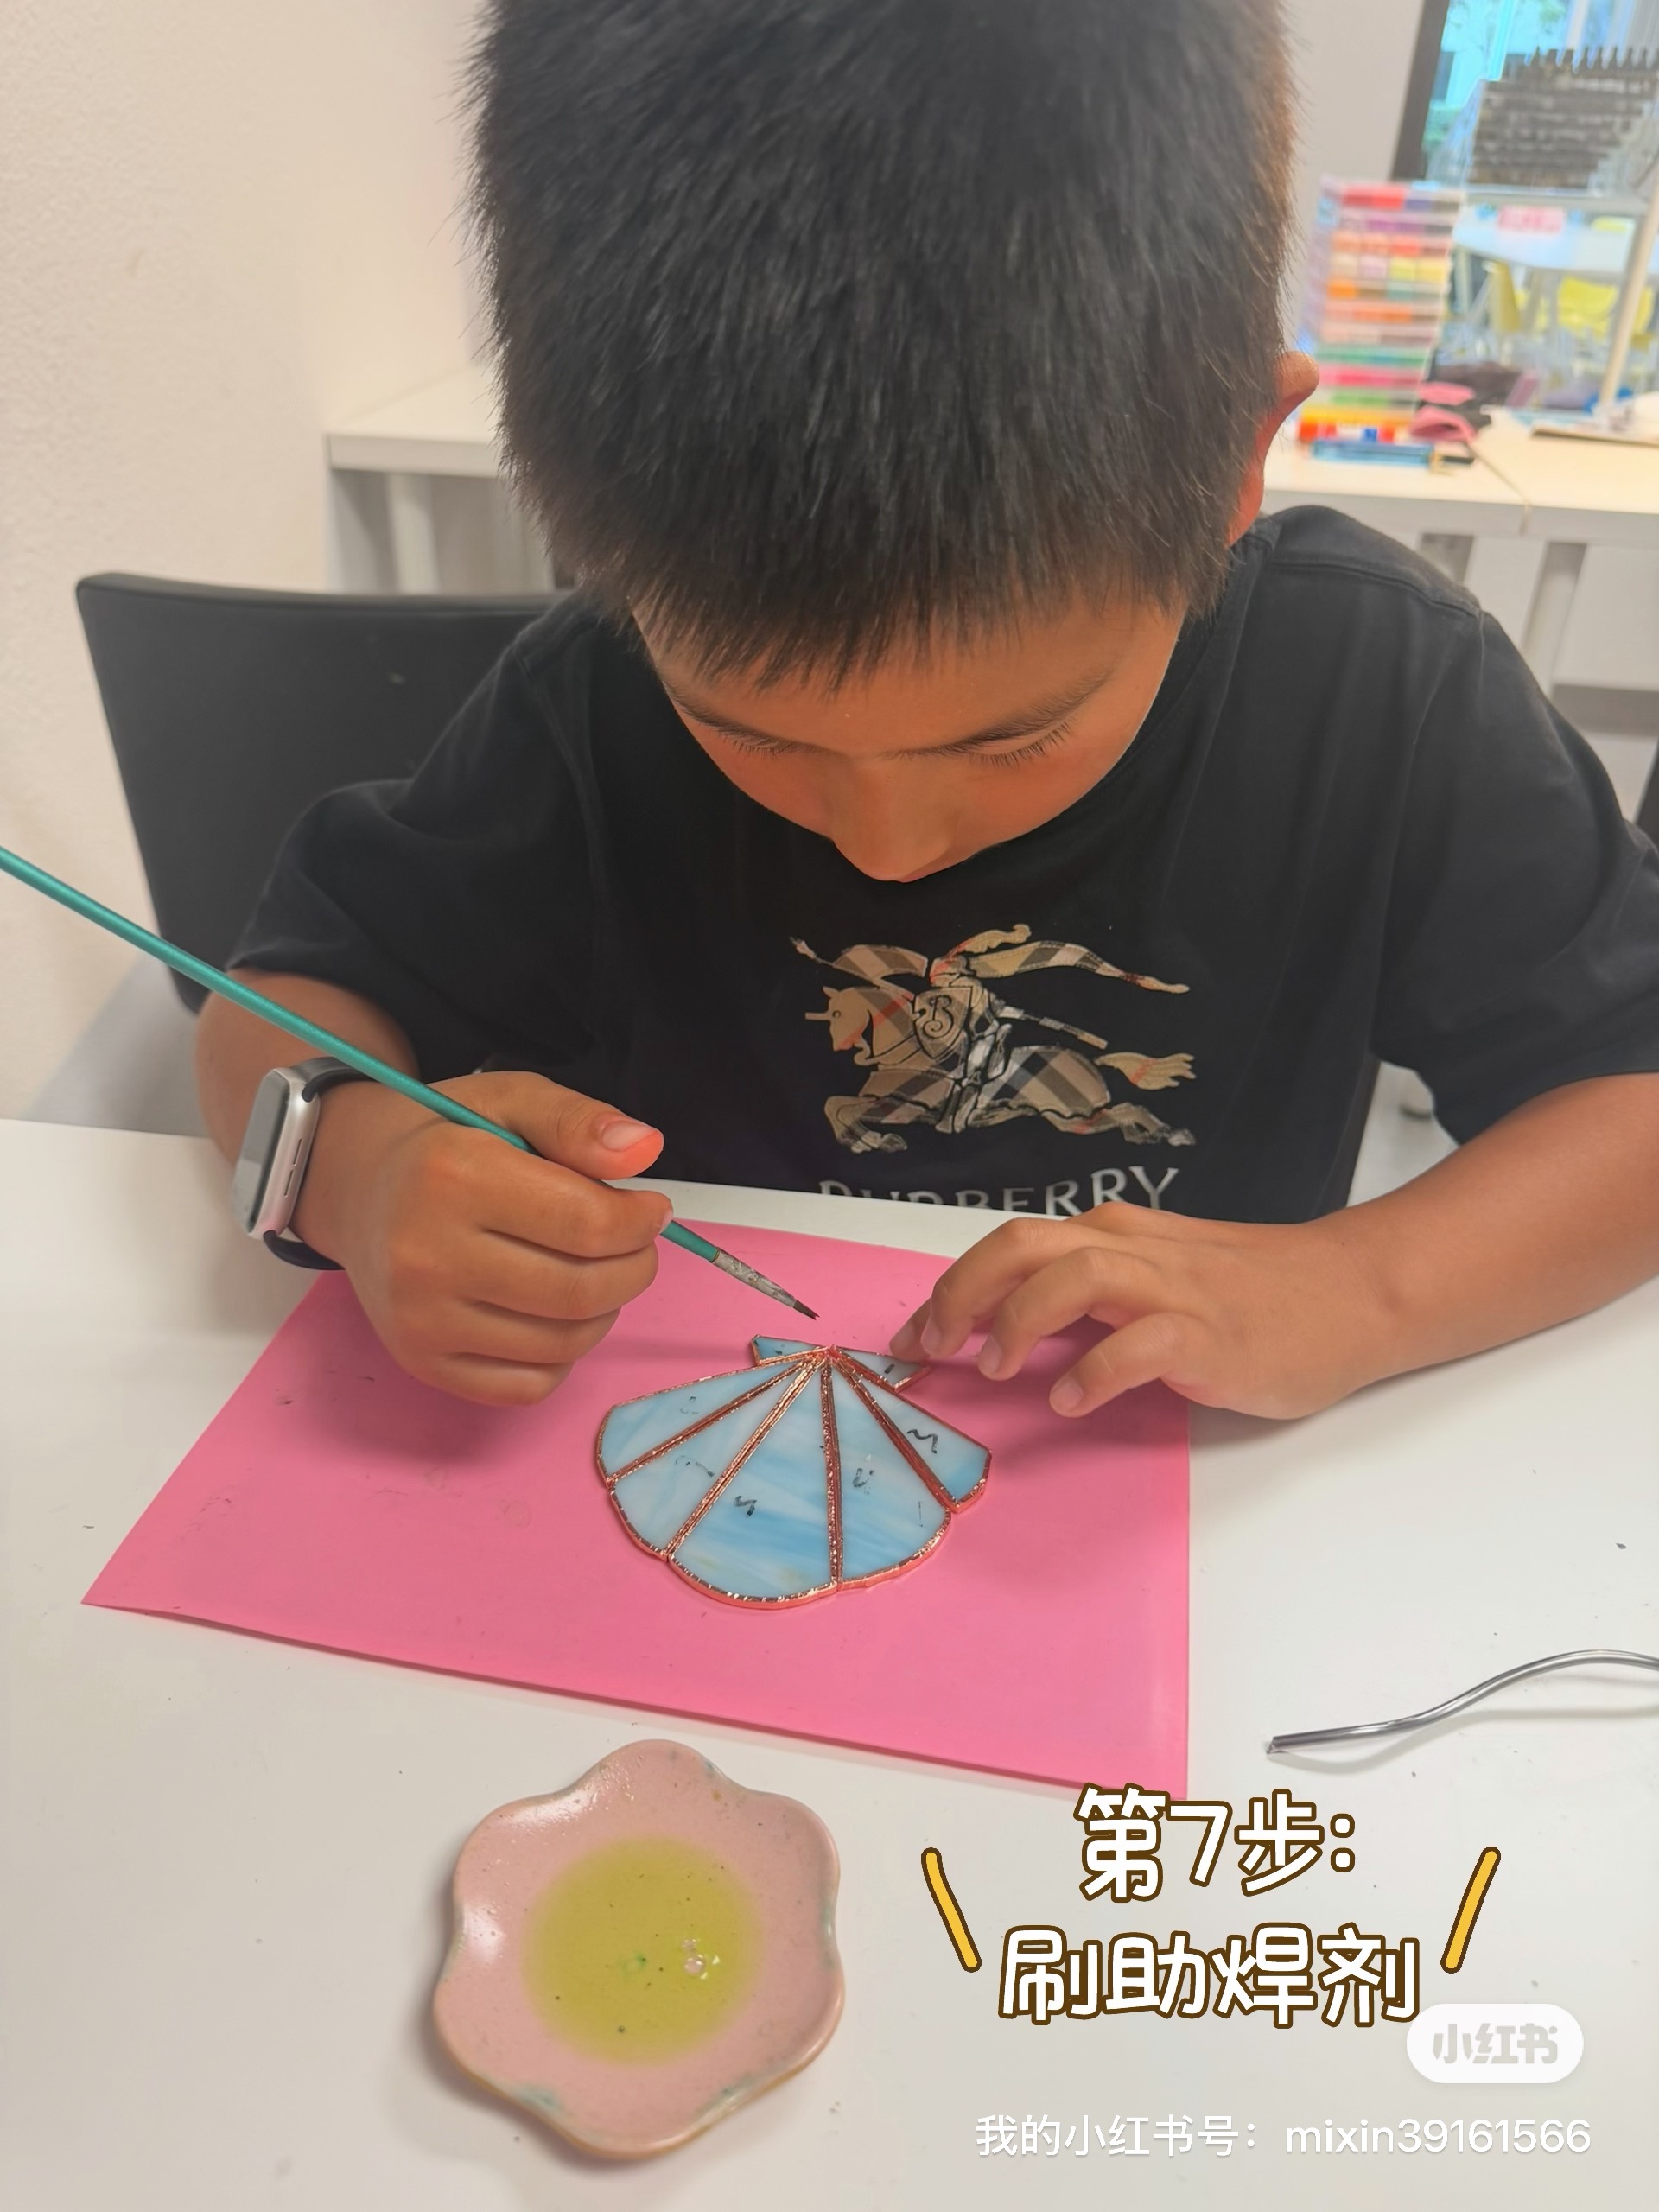
And here’s another thing — the solder doesn’t even stick to the copper directly. You also have to put something called flux on the copper first. Flux is this yellow liquid you paint on with a little brush. Without flux, the solder just rolls off like water on a leaf. With flux, it sticks perfectly.
So the order is:
Glass → Copper Tape → Flux → Solder
If you skip a step, nothing works.
🎨 How I Made My Three Pieces
Okay, now let me tell you about the whole process!
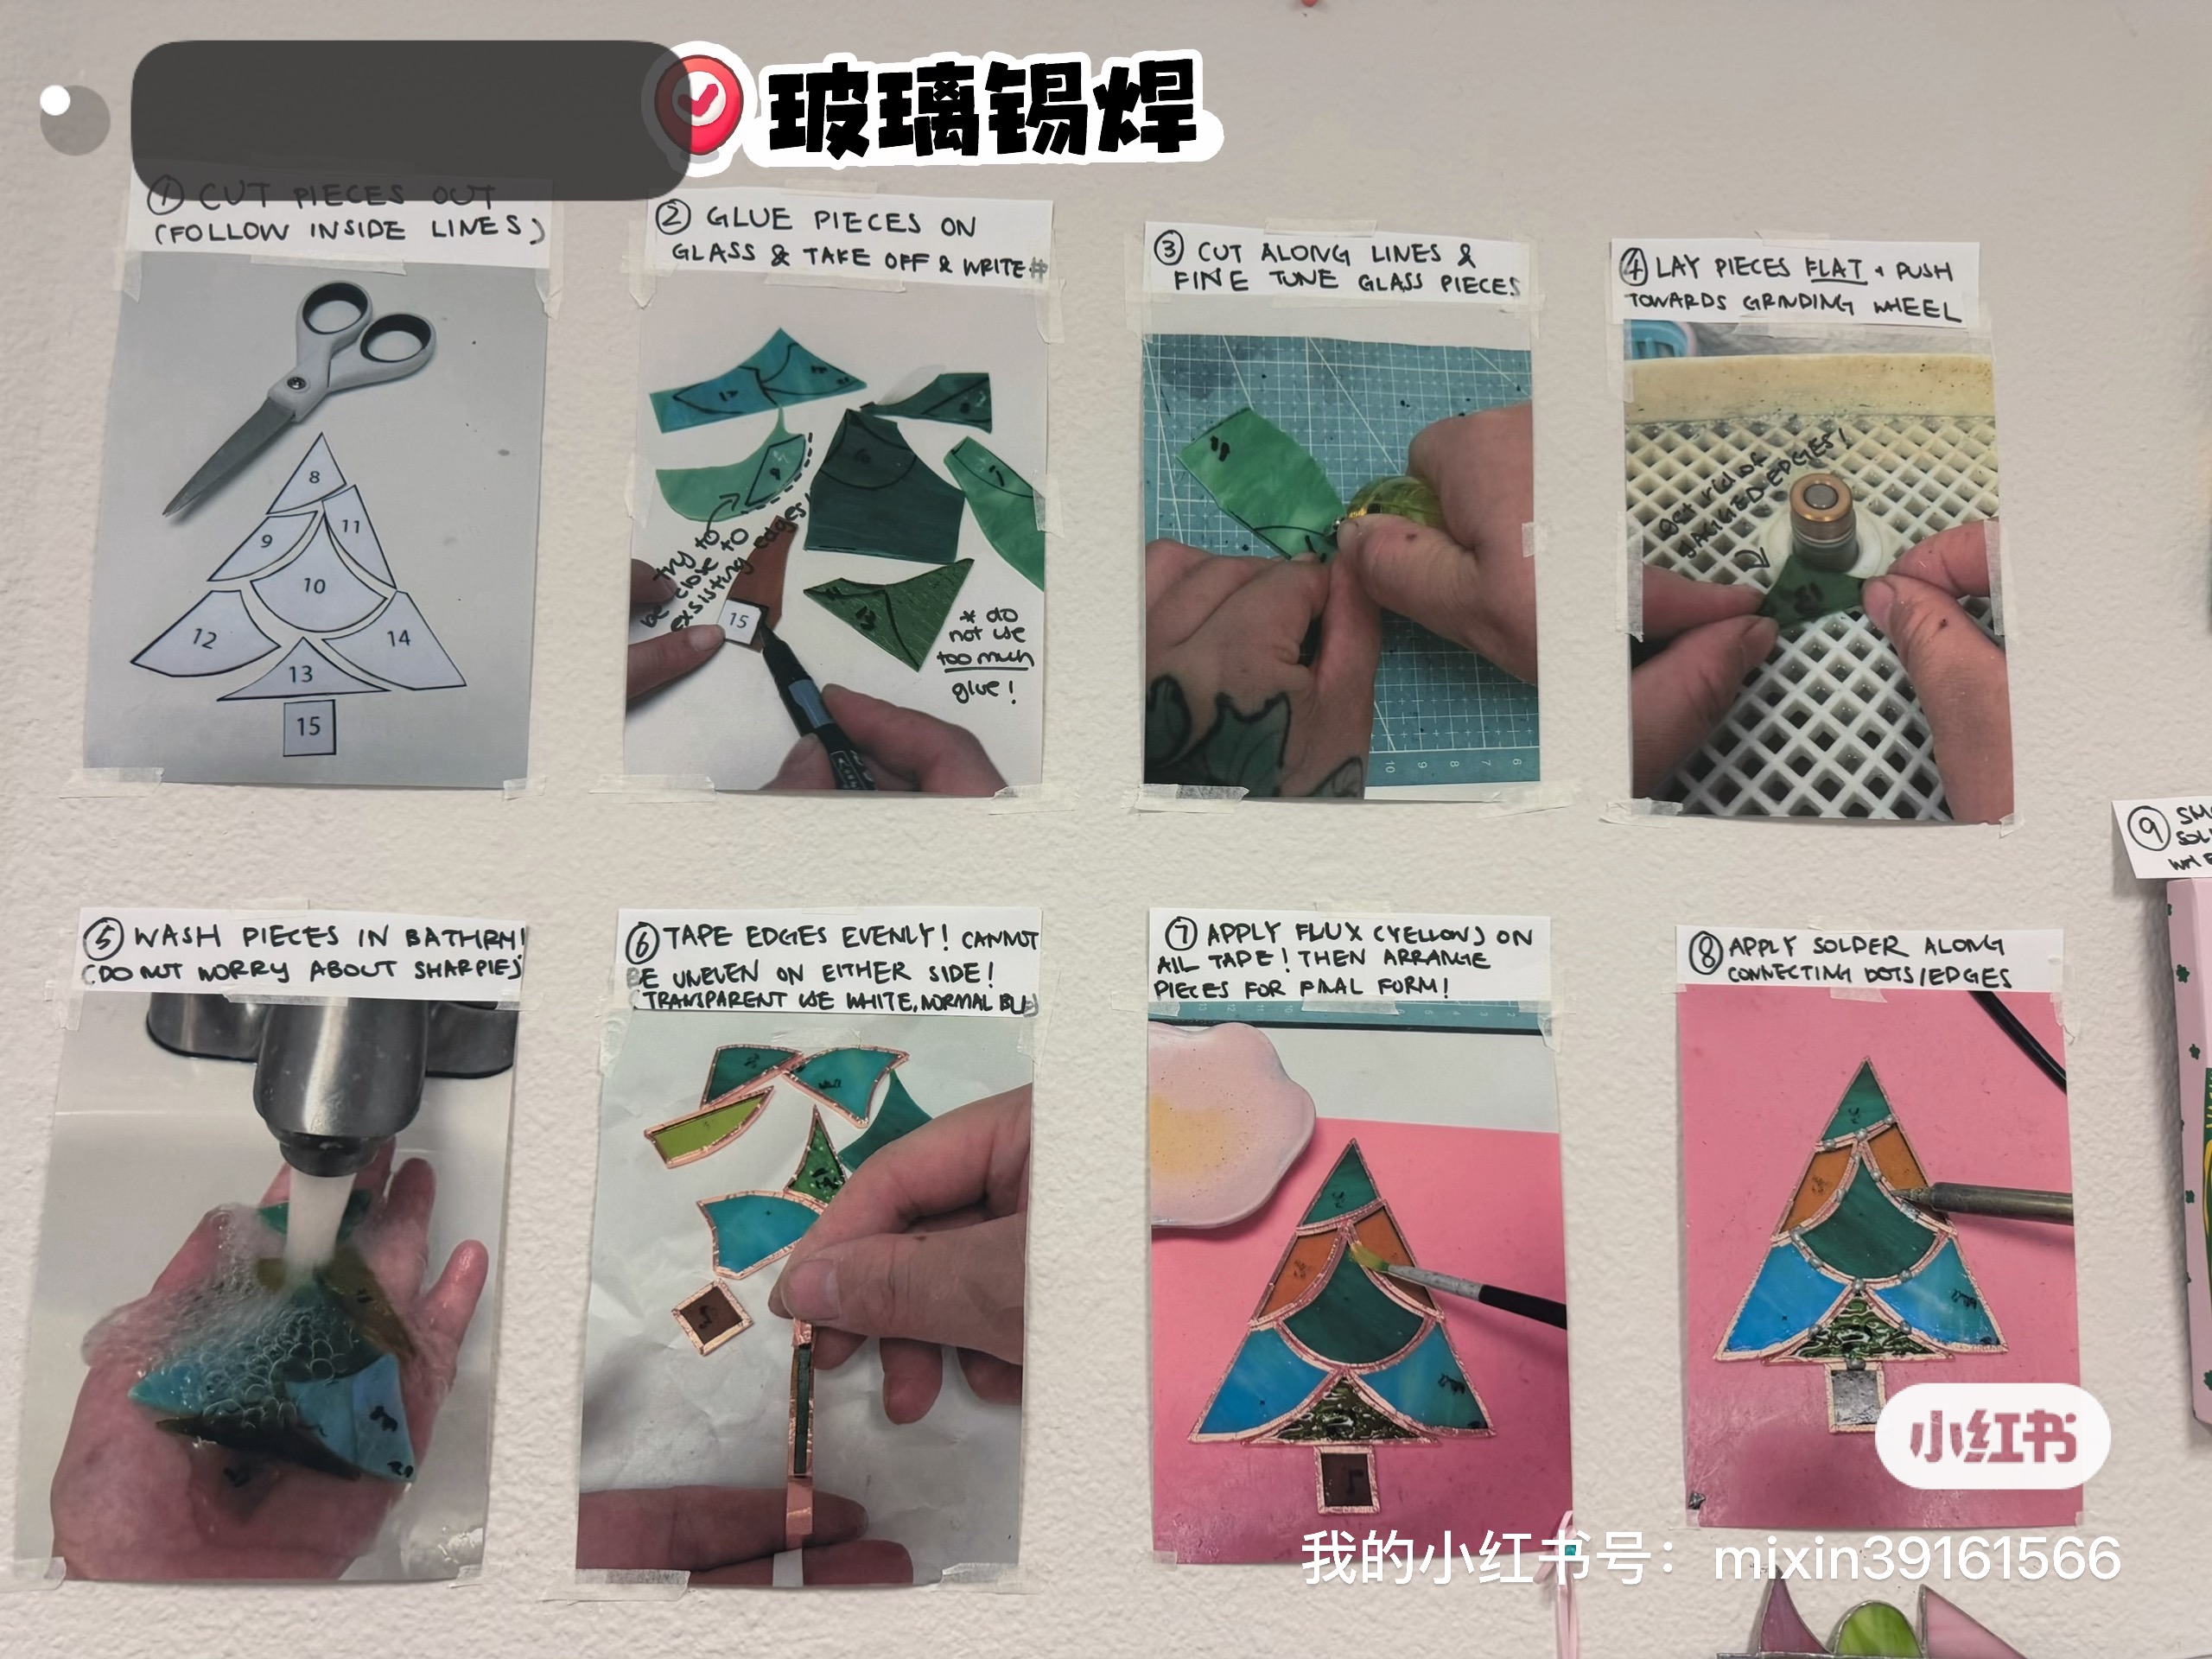
Step 1 — Tracing. First, we used a marker to trace the shapes onto the glass. The studio had really nice glass — all different colors, kind of swirly and shiny. I picked light blue for my clam because it looked like the ocean.
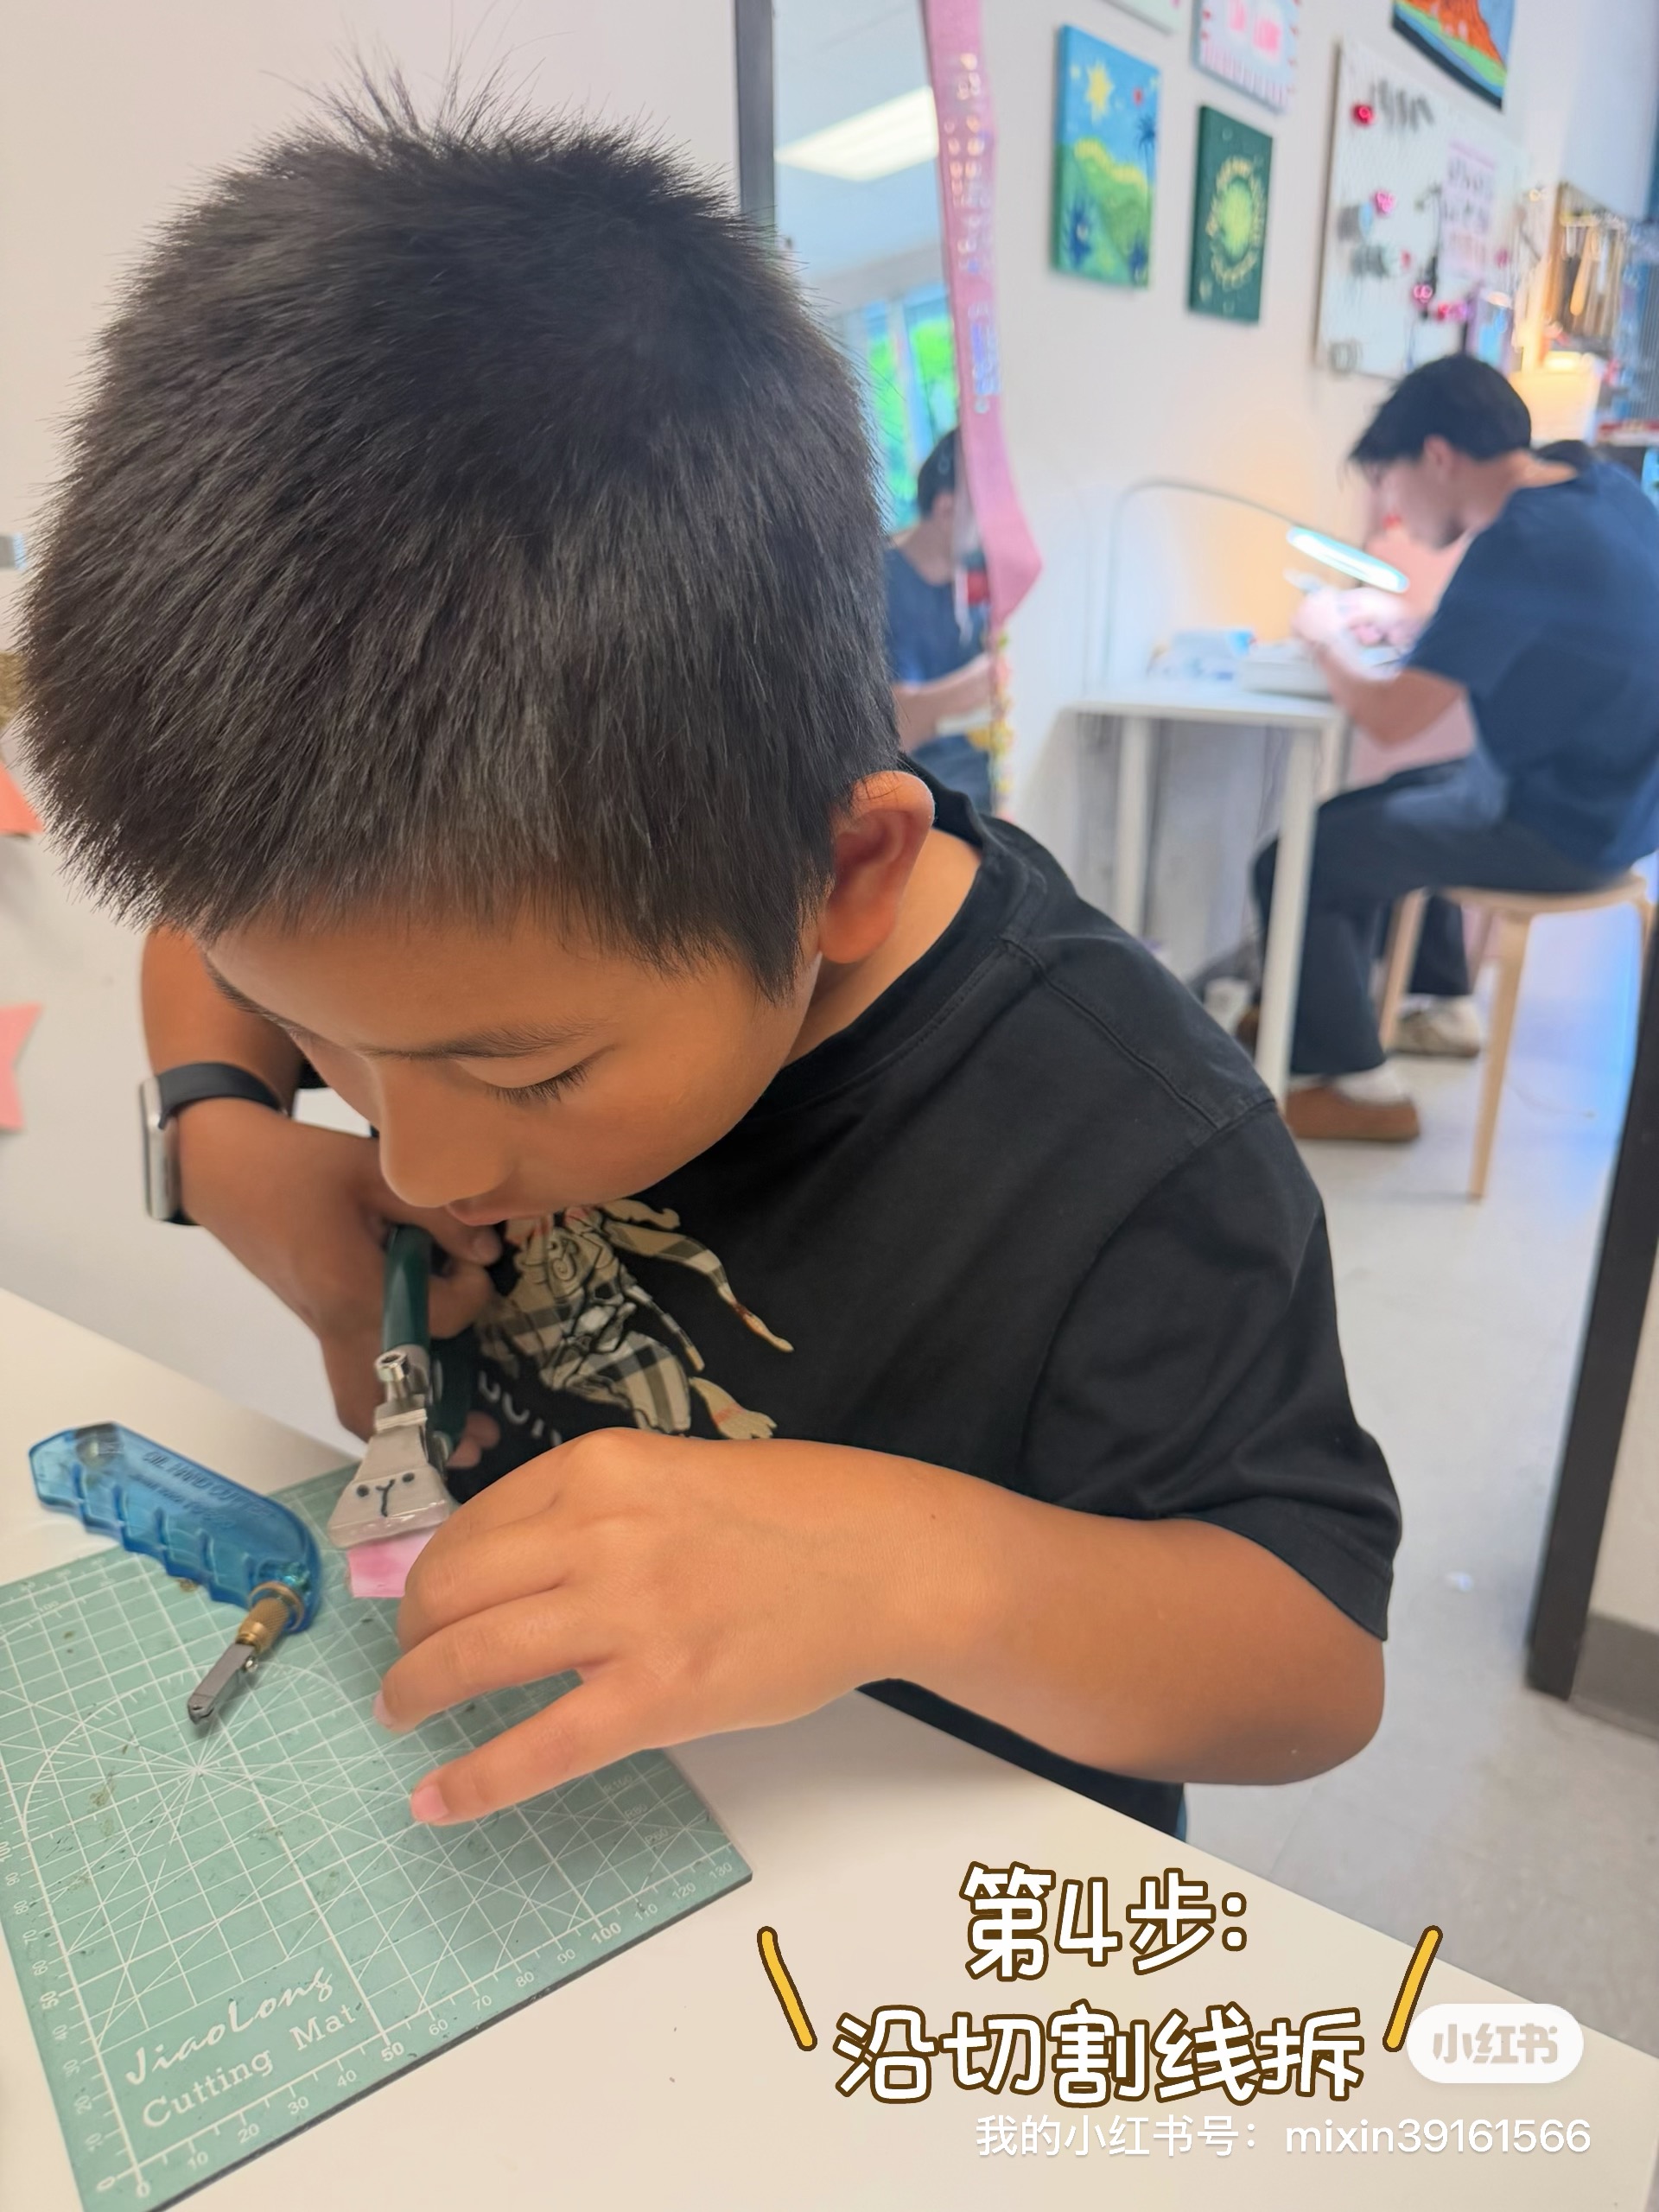
Step 2 — Cutting. Then I cut the glass into pieces. We didn’t use scissors — we used a special tool that scores a line on the glass, and then you snap the glass along the line. Snap! It was kind of scary the first time, but after a few tries I got the hang of it.
Step 3 — Grinding. After cutting, I had to grind the rough edges down on a little grinding wheel.
Step 4 — Washing & Copper Taping. Then wash the pieces, dry them, and wrap every edge with copper tape. The copper tape part took FOREVER. My fingers were tired.
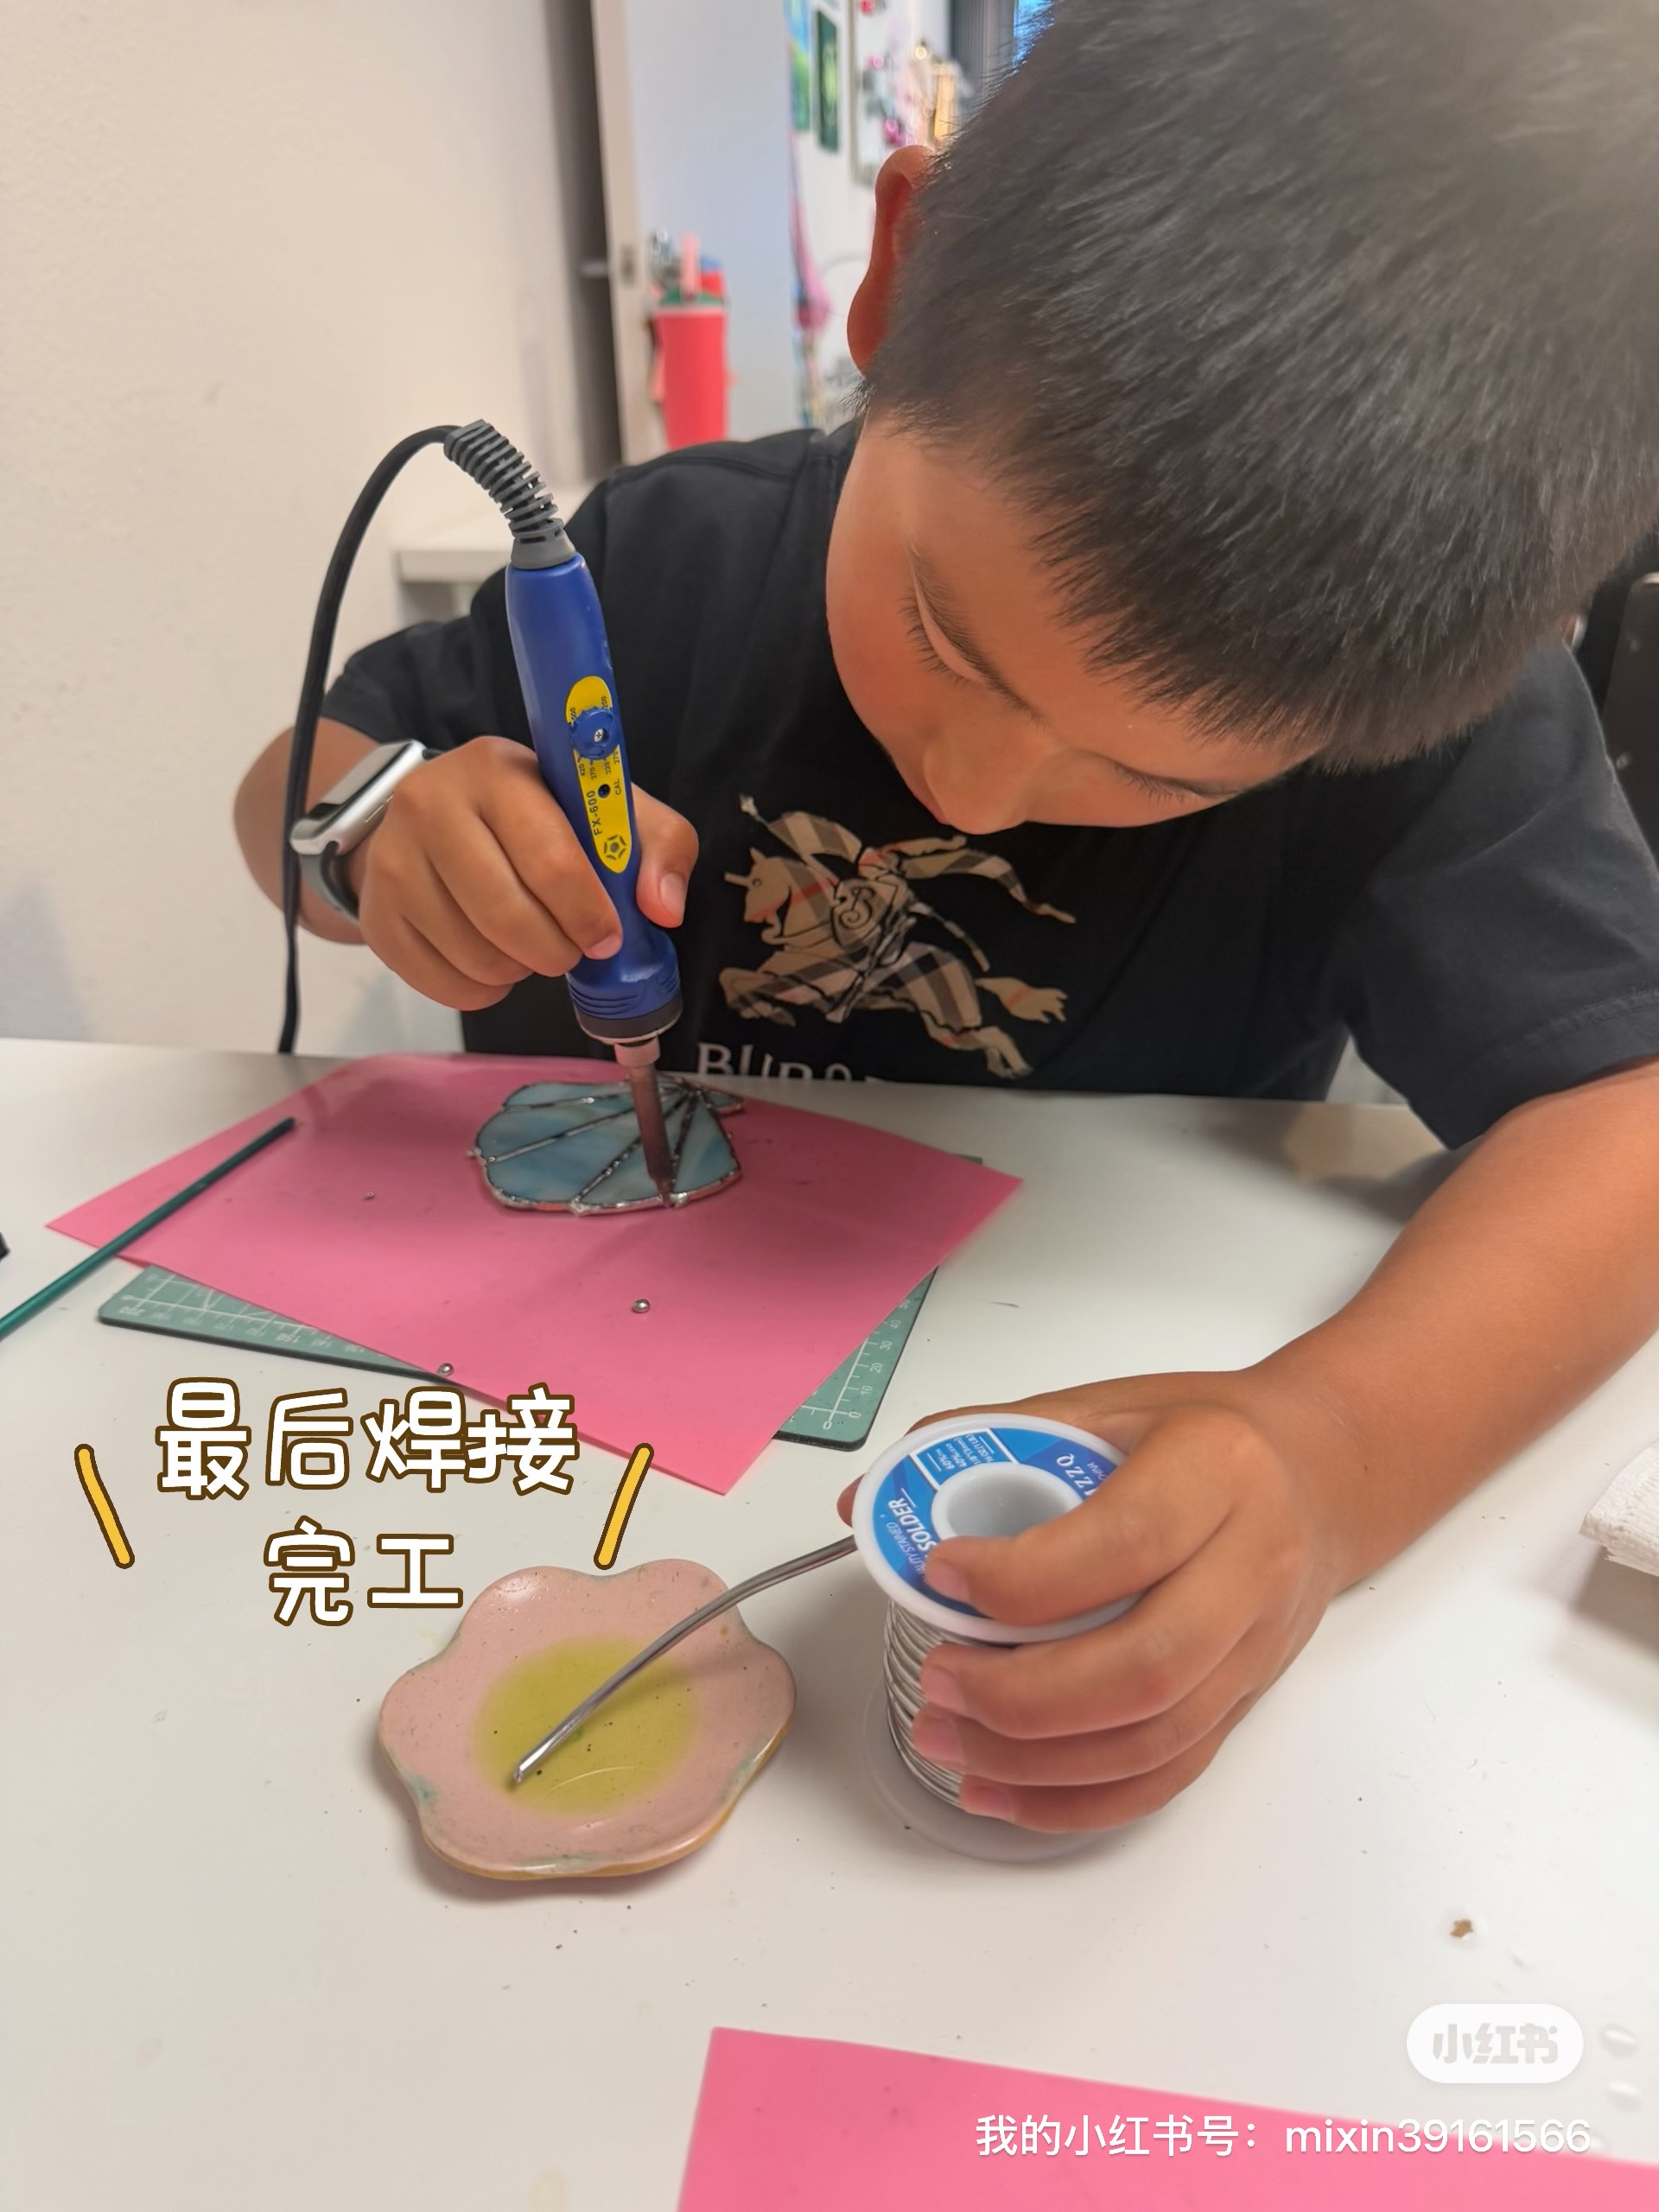
Step 5 — Flux & Solder. Then came the fun part — the hot pen (the soldering iron). I painted flux on the copper, then melted solder along all the lines. The solder turned silvery and shiny when it cooled. It looked like the glass had a metal skeleton holding it together.
💎 The Finished Pieces
I made:
- 🐚 One clam
- 🐠 Two small fish
They were tiny, but I was really happy. I was so tired when I finished — I think I worked for like 3 hours. But when I held them up to the light and saw them shine, it was 100% worth it.
I was very happy after I had done it.
🧠 My Advice If You Want to Try It
- Don’t be scared of the hot pen — just respect it.
- Be patient with the copper tape — it’s the most annoying step but the most important.
- Trust the flux — even when it looks like the solder isn’t sticking, the flux will fix it.
I think I want to make a whale next time. 🐋
📍 Where I Took the Class
If you want to try stained glass too, here’s where I went:
Studio: Softland Studio Instructor: FeiFei Address: 27 Mauchly, Suite 204, Irvine, CA Booking: softlandstudio.com
Big thank you to FeiFei for teaching me — she was super patient and made sure I didn’t burn myself (only my mom got burned 😅). If you go, tell her Yunze sent you!
Thanks for reading! If you’ve ever tried stained glass, what did you make? Tell me in the comments!
今天我去上了一节彩色玻璃课。我做了两条鱼和一个蛤蜊——一共三个作品!虽然都挺小的,但真的超级超级好玩!
在我讲怎么做之前,我想先说今天学到的两件最重要的事情。如果你以后也想试试彩色玻璃,一定要记住这两点!
⚠️ 重要的事情 #1:烙铁真的真的很烫!
用烙铁的时候——它就像一支能把金属融化掉的金属笔——你要非常非常小心。它真的很烫很烫。
我妈妈不小心碰到了一滴还没冷掉的融化金属,结果被烫伤了。我觉得那个铁大概有400度左右吧。所以就算那些金属滴到桌子上、看起来好像没事了,它还是超级烫。不要去碰!要等很久很久才能碰任何东西。
这是最最重要的规则。我是认真的!
🔬 重要的事情 #2:金属其实根本粘不到玻璃上
这个发现真的把我吓到了。
那个融化的金属(叫做焊料)根本粘不到玻璃上。它只能粘在铜上面。所以在焊接之前,你必须先把铜箔胶带包在每一块玻璃的边缘上。
还有一件事——焊料也不能直接粘在铜上面。你还要先在铜上面涂一种叫助焊剂的东西。助焊剂是一种黄色的液体,用小刷子刷上去。没有助焊剂的话,焊料就会像水珠在叶子上一样滚来滚去,粘不住。有了助焊剂,它就能完美地粘上去啦!
所以顺序是这样的:
玻璃 → 铜箔胶带 → 助焊剂 → 焊料
少了任何一步都没办法做成功的!
🎨 我是怎么做出这三个作品的
好啦,现在让我来给你讲整个过程!
第一步——描形状。 首先,我们用马克笔把形状描到玻璃上。工作室里的玻璃真的很漂亮——有好多好多颜色,看起来像漩涡一样,闪闪发光。我给我的蛤蜊选了浅蓝色,因为它看起来像大海。
第二步——切割。 然后我把玻璃切成一块一块的。我们不是用剪刀剪的——我们用了一种特别的工具,先在玻璃上划一条线,然后沿着那条线把玻璃掰断。啪! 第一次的时候有点吓到我,但是试了几次之后我就找到感觉了。
第三步——打磨。 切完之后,我要在一个小小的打磨轮上把毛糙的边缘磨平。
第四步——清洗和贴铜箔胶带。 然后把玻璃洗干净、擦干,再把每条边都贴上铜箔胶带。贴铜箔胶带这一步花了好好好长时间。我的手指都累坏了。
第五步——涂助焊剂和焊接。 然后就到了最好玩的部分——用那支热笔(就是烙铁)!我先把助焊剂涂在铜上,然后沿着所有的线把焊料融化上去。焊料冷掉之后变成银色的,亮亮的。看起来就像玻璃有了一副金属骨架把它们都撑在一起一样!
💎 做好的作品
我做了:
- 🐚 一个蛤蜊
- 🐠 两条小鱼
它们都很小,但我真的超级开心。做完之后我累得不行——我觉得我大概做了3个小时。但是当我把它们举起来对着光看,看到它们在发光的时候,感觉一切都值了!
做完之后我真的好开心好开心。
🧠 如果你也想试试,我的建议是
- 不要怕那支热笔——只要小心地用它就好。
- 贴铜箔胶带的时候要耐心——这一步最烦人,但也是最重要的。
- 相信助焊剂——就算感觉焊料粘不上去,助焊剂会搞定的。
我觉得我下次想做一头鲸鱼!🐋
📍 我在哪里上的课
如果你也想试试彩色玻璃,这是我去的地方:
工作室: Softland Studio 老师: FeiFei 地址: 27 Mauchly, Suite 204, Irvine, CA 预约: softlandstudio.com
超级感谢FeiFei老师教我——她超级有耐心,还一直确保我不会烫到自己(结果只有我妈妈被烫到了😅)。如果你去的话,告诉她是云泽介绍你去的!
谢谢你看完!如果你也试过彩色玻璃,你做了什么呢?在评论里告诉我吧!
评论 Comments 加载中… LOADING…
登录后阅读 / 加入讨论 → Sign in to read and join the discussion →